Hello fellow yarn lovers! Are you ready to add a burst of sweet, handcrafted charm to your life? Today, we’re diving into the delightful world of the Crochet Strawberry Stitch, a pattern so joyful it practically radiates sunshine and summer vibes!
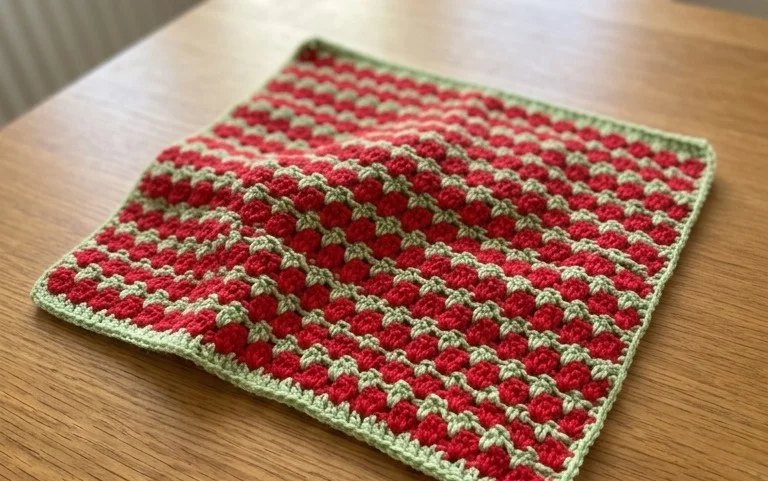
Imagine rows of plump, textured strawberries, each one a little pop of vibrant red, nestled amongst green leaves. This stitch creates a truly darling fabric that’s perfect for so many projects! Whether you’re a beginner eager to try something new and rewarding, looking for a unique handmade gift that will be cherished, or simply want to bring a touch of cheerful home decor into your space, this strawberry stitch is an absolute winner.
In this tutorial, we’ll guide you step-by-step, breaking down each stitch to ensure you can create these adorable berries with confidence. Get your hooks ready, and let’s craft some happiness together!
## Crafting Happiness: Your Detailed Crochet Strawberry Stitch Tutorial
There’s something inherently joyful about crocheting. It’s a quiet, mindful act that results in tangible, often beautiful, creations. And when those creations bring to mind sweet, summer treats, the happiness level gets amplified! Today, we’re diving deep into the delightful world of the Crochet Strawberry Stitch, a textured and charming pattern perfect for adding a pop of fruity fun to your makes. Whether you’re a seasoned crocheter looking for a new stitch to master or a beginner eager to try something wonderfully whimsical, this tutorial will guide you every step of the way.
### The Magic of the Strawberry Stitch: A Textured Delight
The beauty of the Crochet Strawberry Stitch lies in its ability to mimic the plump, textured surface of a real strawberry. It’s not just a flat pattern; it creates small, raised bobbles that give your crochet piece an almost edible appearance. This stitch is incredibly versatile, making it a fantastic addition to your crochet repertoire.
### Yarn & Hook: Choosing Your Perfect Pair
The right yarn and hook can make all the difference in how your Strawberry Stitch turns out. For this pattern, we want a yarn that has good stitch definition to showcase the texture of the stitch, and a hook that complements your chosen yarn weight.
Yarn Recommendations:
* **Cotton Yarns:** These are a top choice for the Strawberry Stitch, especially if you’re aiming for something like dishcloths, amigurumi, or market bags. Cotton is breathable, absorbent, and holds its shape well, which helps the strawberry texture pop. Look for mercerized cotton for a slight sheen and even more defined stitches.
* **Acrylic Yarns:** A great all-rounder, acrylic is affordable, durable, and comes in a vast array of colors. Worsted weight acrylic is a common and excellent choice for this stitch. If you’re making garments or accessories, a softer acrylic blend can be lovely.
* **Blends:** Cotton-acrylic blends offer the best of both worlds – the softness and drape of acrylic with the breathability and stitch definition of cotton.
**For our tutorial, let’s imagine we’re using a medium (worsted) weight yarn.** This is a popular weight that’s easy to work with and allows the stitch definition to shine.
Hook Recommendations:
Your hook size will depend on your yarn weight and the fabric you want to achieve. For a worsted weight yarn, a hook in the range of **4.0mm (G-6) to 5.0mm (H-8)** is generally a good starting point.
* **Smaller hook:** Using a slightly smaller hook than recommended on your yarn label will create a tighter fabric, making the strawberry texture more pronounced and less likely to have gaps. This is often ideal for amigurumi or items that need to be sturdy.
* **Larger hook:** A larger hook will create a looser, drapier fabric. This might be suitable for blankets or scarves where you want a more subtle textured effect.
**For our tutorial, we’ll aim for a hook that creates a nice, firm fabric without being too stiff, so let’s suggest a 4.5mm (G+ or 7) hook.** Always do a small swatch with your chosen yarn and hook to test your tension and gauge!
Mastering the Stitch Techniques
The Strawberry Stitch is built upon a few fundamental crochet techniques. Understanding these will make the pattern a breeze to follow.
Key Stitches Used:
* **Chain (ch):** The foundation of most crochet projects, creating a series of loops to build upon.
* **Single Crochet (sc):** A basic stitch that creates a dense, firm fabric. It’s often used as the base for building texture.
* **Double Crochet (dc):** A taller stitch that creates a looser fabric than single crochet. This is often used in conjunction with other stitches to create the bobble effect.
* **The “Strawberry” Bobble (or cluster):** This is the star of our show! While there are variations, the most common way to create the strawberry bobble is by working several stitches (often double crochets or half double crochets) **partially** into the same stitch or space, and then pulling the yarn through all the loops on your hook at once. For a distinct strawberry shape, we’ll typically work 3 or 4 double crochets into a single stitch, leaving the last loop of each dc on the hook, and then completing them all together.
**Let’s break down the typical Strawberry Bobble (using 4 half double crochets for a nice plumpness):**
1. Yarn over (yo) and insert your hook into the designated stitch or space.
2. Yarn over and pull up a loop (you now have 3 loops on your hook).
3. Yarn over and pull through 2 loops (you now have 2 loops on your hook).
4. **Repeat steps 1-3 three more times in the same stitch/space.** (You will have a total of 5 loops on your hook after completing this four times).
5. Yarn over and pull through all 5 loops on your hook.
This creates a small, raised bump that resembles a strawberry!
### Tips for Beginners: Making it Easier
Embarking on a new stitch can feel daunting, but with a few beginner-friendly tips, you’ll be crocheting strawberries in no time!
- Start with a Swatch: Before diving into a full project, crochet a small swatch of the Strawberry Stitch. This will help you get a feel for the yarn and hook combination, understand the tension required for the bobble, and practice the stitch without committing to a large piece.
- Count Your Stitches: Especially when working the bobble, it’s crucial to count carefully. Make sure you’re working the correct number of stitches into the designated spot and completing the bobble correctly.
- Don’t Pull Too Tight: While you want a defined texture, don’t pull your stitches so tightly that you can’t insert your hook into them for the next row. This can lead to a rigid fabric and difficulty in crocheting.
- Use Stitch Markers: When learning, stitch markers can be incredibly helpful. Mark the beginning and end of your rows, or key stitches where the bobble is worked, to keep you on track.
- Watch Video Tutorials: While written instructions are great, sometimes seeing the stitch worked in action can be a game-changer. Search for “Crochet Strawberry Stitch video tutorial” online – seeing the bobble formed can make all the difference.
- Be Patient! Every crocheter learns at their own pace. Don’t get discouraged if it takes a few tries to get the bobble just right. Keep practicing, and you’ll master it.
### Customization: Making It Uniquely Yours
The beauty of crochet lies in its adaptability. The Strawberry Stitch is no exception! Here’s how you can make this pattern your own:
Colors:
* **Classic Red:** For that quintessential strawberry look, vibrant reds are a must!
* **Pink Hues:** Experiment with various shades of pink for a softer, more whimsical strawberry.
* **Green Accents:** Use green yarn for the leaves or stems, perhaps as a border or for small amigurumi leaves.
* **Ombre or Variegated Yarns:** These can create beautiful, natural-looking color transitions within the strawberries themselves.
* **Unexpected Colors:** Don’t be afraid to get creative! Blue strawberries? Purple? The possibilities are endless for a truly unique creation.
Sizes:
The size of your finished strawberry piece is primarily determined by:
* **Yarn Weight:** Finer weight yarns (like sport or DK) with a corresponding smaller hook will result in smaller strawberries. Bulker yarns (like bulky or super bulky) with a larger hook will create larger, more prominent strawberries.
* **Hook Size:** As mentioned, a smaller hook with a given yarn will create a denser, slightly smaller stitch and thus a smaller overall piece. Conversely, a larger hook will yield a larger result.
* **Stitch Count:** If you’re working the Strawberry Stitch in rows or as a motif, adjusting the number of stitches you work the bobbles into, or the number of repeat rows, will directly impact the size of your finished item.
Caring for Your Crocheted Happiness
Once your beautiful strawberry creations are complete, you’ll want to keep them looking their best. Here are some general care instructions:
- Washing: For most cotton and acrylic yarns, a gentle machine wash on a cool or warm cycle is acceptable. It’s always best to check the yarn label for specific washing instructions. For more delicate items or those made with wool blends, hand washing in cool water with a mild detergent is recommended.
- Drying: Avoid the dryer if possible, as it can cause shrinkage and damage to the fibers. Instead, lay your crocheted items flat to air dry. This helps them retain their shape and prevents stretching. You can gently reshape the item while it’s damp.
- Blocking: For items like doilies, granny squares, or garments where a crisp finish is desired, blocking is highly recommended. This involves wetting the item and then pinning it into the desired shape and dimensions, allowing it to dry. This evens out stitches and can significantly improve the look of your finished piece.
- Storage: Store your crocheted items folded or rolled in a breathable garment bag or drawer. Avoid plastic bags, which can trap moisture and lead to mildew.
Project Ideas: What to Create with Your Strawberry Stitch!
Now for the fun part – what can you make with this delightful Strawberry Stitch? The possibilities are as sweet as the stitch itself!
- Dishcloths & Washcloths: The textured nature of the stitch makes for excellent scrubbing power, and the cheerful strawberry design adds a touch of joy to your kitchen or bathroom.
- Amigurumi: Crocheting little strawberry characters is incredibly popular! You can make individual strawberries, or create a whole patch of them for a delightful display.
- Coasters: Protect your surfaces with these adorable, functional coasters. They make fantastic handmade gifts!
- Bags & Totes: Incorporate the Strawberry Stitch into market bags, clutches, or small drawstring pouches for a unique and eye-catching design.
- Appliqués & Embellishments: Crochet individual strawberries and stitch them onto hats, scarves, blankets, or clothing for a charming decorative touch.
- Blanket Motifs: Create a beautiful blanket by joining squares or hexagons that feature the Strawberry Stitch.
- Garment Details: Add a Strawberry Stitch panel to a sweater, a border to a skirt, or even as cuffs on gloves for a playful accent.
- Keychains & Charms: Small, crocheted strawberries are perfect for making cute keychains or bag charms.
The Crochet Strawberry Stitch is more than just a pattern; it’s an invitation to create something cheerful and handmade. With this detailed guide, you have all the tools and inspiration you need to start crafting your own happiness, one delightful strawberry at a time! So grab your yarn, pick up your hook, and let the sweet crafting begin!
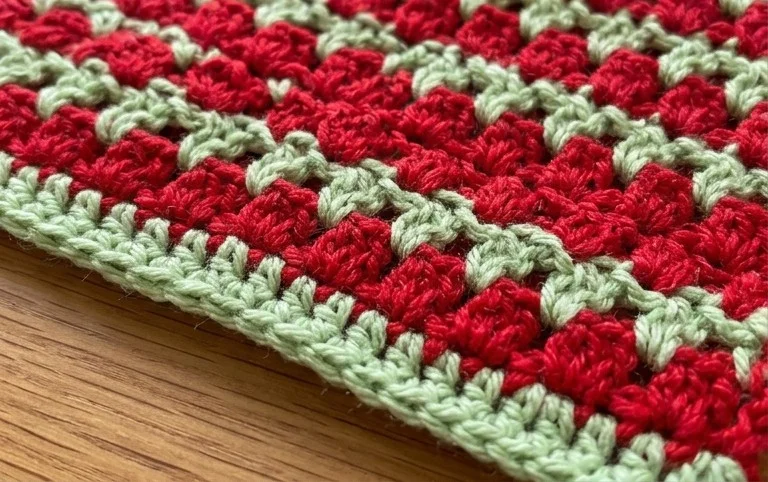
And there you have it – your very own adorable crochet strawberry stitch! We hope this tutorial has brought a sprinkle of joy and creativity to your crafting corner. Don’t hesitate to dive in and try this sweet pattern for yourself. We can’t wait to see your delightful strawberry creations! Share your finished projects with us on social media using #CrochetStrawberryJoy – your crafty endeavors inspire us all!
Feel free to experiment with different yarn colors and textures to create a whole patch of unique strawberries. Perhaps a mini strawberry keychain or a charming strawberry appliqué for your next garment? The possibilities are as endless as your imagination! And when you’re ready for more delightful crochet adventures, be sure to explore our other patterns. Happy crocheting!